

I’ve already mentioned this in a few different places – but I thought I’d take a moment to explain an idea I’m messing around with for the (really) simple method of generating random dungeons (mainly for solo/co-op play).
Now, at the moment, I’m trying to have it be a system neutral kind of thing – though I might end up making my own basic dungeon crawler in the future… but that’s a post for another time :)
Anyway, as I say, in this article I’m going to have a go at explaining how the ‘dungeon generation’ works – just in case that is of interest to anyone (plus, it'll be something I can refer to when I release the video where I make some of the different components).
So, to begin with, you’ll need to think of a reason for your character (or group of characters) to enter the dungeon (or roll on a random table - if something like that is available to you - as I say, this system is purely for generating the dungeon). In this example Sir Karlandos has been tasked with exploring a series of ancient catacombs to retrieve an ancient artefact (note that I’m using 5E as the rule set for combat and the like in this example, and that my level 1 Paladin is being accompanied by two loyal men-at-arms – which are using the CR 1/8 ‘guard’ statblock).

Next, you’ll need to fill out a few charts. Basically you’ll need to decide what kind of creatures will be appearing as ‘wandering monsters,’ what kind will be found in ‘lairs’ and what types will be found in the main quest room (if you’ve played Advanced HeroQuest, a lot of this will sound very similar ;) ). Plus there’s a few other things that’ll need filling out – if you’re interested in seeing what I put together for this particular quest, you can find it HERE.

Anyway, before our brave party enter the dungeon, I’ll first need to shuffle the ‘passage’ deck – but before I do the same with the ‘room’ deck, I’ll need to remove the ‘Quest Room’ card. Then I’ll shuffle the remaining cards, and deal out three cards from the top. I’ll then shuffle the quest room into these three – and then place them at the bottom of the main deck. This means that the ‘Quest Room’ will be one of the last four rooms to be encountered (i.e. we don’t know exactly when it will appear – but it will be towards the end of the adventure).
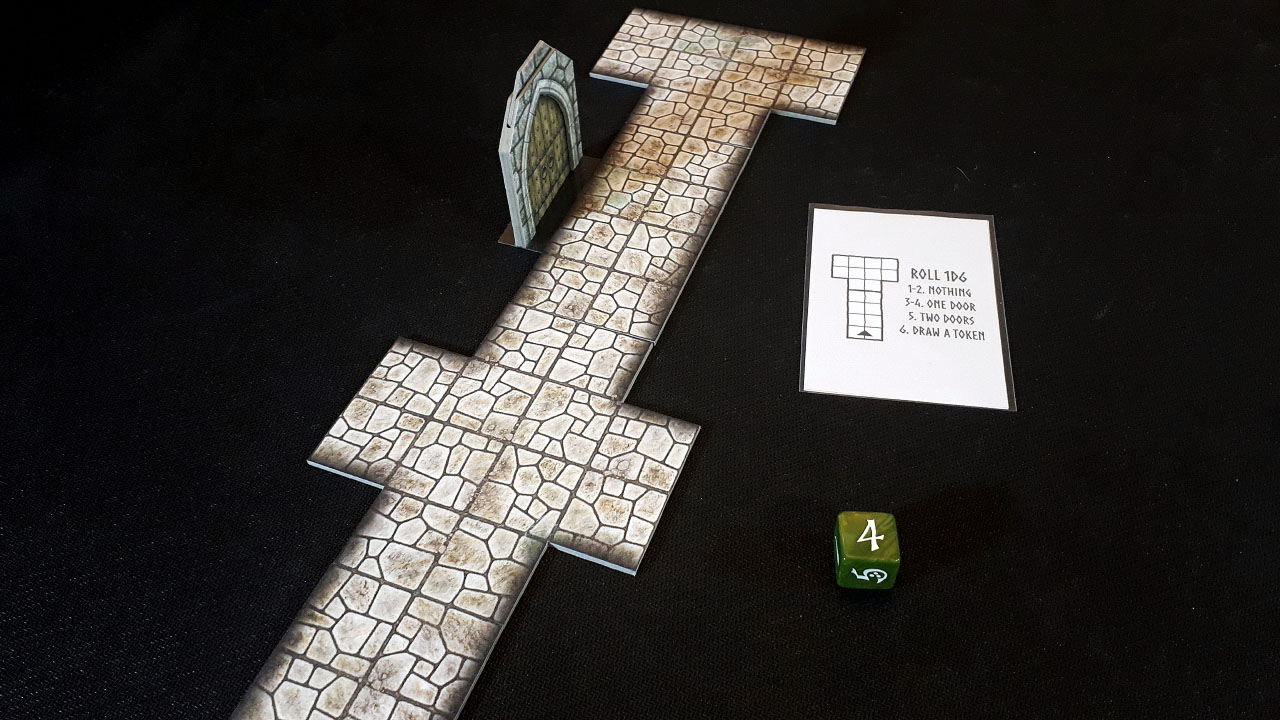
And with that out of the way, I can place the stairway tile and the crossroads…

...and because the party can see past the junction to the north (we’ll assume north is the top of all the photographs in this example) I’ll draw a card from the passage deck and lay out the dungeon as pictured on the card... roll a d6… and place any doors (you can randomise the door placement, or just place them where it seems the most logical).
Turn 1: Karlandos advances to the crossroads – but doesn’t want to get too far ahead, so he waits for the men-at-arms to catch up.
I then draw a card to see what lies down the east passage and roll a d6 - resulting in a dead end with no doors. However we also need to draw a token – getting a ‘wandering monster token’...

...but in this adventure I have decided beforehand that I’ll need to have three of the same tokens in play to trigger that effect (so we’re safe for now).
Then I’ll draw another card and roll a d6 to generate the west passage... and I get a short passage with a left turn... and in that passage is a single doorway.

That ends the turn… and at the end of each turn the standard procedure is to draw a token...

...and this time I get a ‘blank/nothing’ result.
Turn 2: Karlandos and his men advance down the west passage and congregate outside the doorway before opening it. So, this time I draw from the room deck, and roll a d6 – which reveals a ‘special room’ with two more exits.

(Mistake number one – this card also states that I must immediately draw a token – but I didn’t spot that… oops).
Now in this example quest, I’ve kept the ‘special rooms’ rather simple (as you could probably devise a chart for all sorts of things) – and in this instance I’ve rolled a 2...

...which means I then roll on the ‘features’ table… another 2...

...which indicates that there are some shelves or cupboards in this room – which a character may search!
However, that’s the end of the turn – so I draw another counter (this time getting a trap token ...but as I said earlier, I’m safe at the moment, as I need to draw three of the same kind to trigger that particular event).

Turn 3: Karlandos enters the room – instructing is men to keep watch near the door. Searching the shelves he rolls as instructed on the chart, and discovers 70gp worth of gems. Not bad for the first room!

However, that’s all he does this turn – so we draw another counter.

Turn 4: Our group of brave adventurers ‘double move' to get to the door that they saw earlier in the north passage. That’s the end of the turn… so another counter is drawn…

...another trap counter (one more of either of the 'M' or the 'T' and I might be in trouble).
Turn 5: The paladin opens the door to reveal a ‘Monster Lair’

So I roll on the lair table to find out what’s inside (a skeleton and a giant rat in this instance), and I roll a d6 for each of them – to see how many squares away from the door they are.

(mistake number two – monster lairs always contain at least one ‘feature’ – but I forgot to roll for one here… double oops).
I roll initiative and one of the guards heads off towards the rat, while Karlandos and the other guard take on the skeleton (and in this round of combat every character/monster hits, and deals damage).
At the end of the turn I draw a token... and it’s a trap!
That means there are now 3 trap tokens in play – so I roll on the trap table and get a result of ‘poison gas’ ...so one of our characters has triggered a trap that fills the room with noxious fumes. All of the living creatures make a saving throw – and only one guard passes – leaving everyone else (except the skeleton) with the ‘poisoned’ condition.

However, because an event was just triggered, all of the counters go back into the bag/cup (i.e. we start again from scratch each time an event is triggered - or when a ‘restock / R’ token is drawn).
Turn 6: First the giant rat is dealt with, and then the skeleton falls – though both characters fail their saving throw again, and are still poisoned.
At the end of the round we draw a counter. This time a ‘wandering monster’ again (but luckily the counters have been reset – so it’s the only one in play at the moment – phew!)

Turn 7: Deciding that it would be unwise to venture farther while two members of the group are still coughing and spluttering from the gas, they wait it out for a round (both passing their saves this turn), and Sir Karlandos heals himself for 3 points of damage.
And, at the end of the turn, another counter is drawn...

...and now there are two 'wandering monster' counters in play.
Turn 8: The door is opened – and while you would normally roll randomly to determine whether a room leads into a passage or another room, in this instance it makes sense for it to lead into another room (due to the way the passage below it has already been generated).
This room is another lair – this time with no extra exits, two giant rats, and a coffin (as I remembered to roll on the ‘features’ table this time ;) ).

The rats win initiative, and attack the party (injuring the second guard) – but one of the rats is slain in return.
At the end of the round we draw a token – and unfortunately it’s another ‘wandering monster’ token… and after rolling on the ‘wandering monster’ chart, we discover that a zombie has been drawn towards all the noise – and it is placed as far away from the party as possible – but within their line of sight.

“Sir!” exclaims one of the guards. “Sir… we have a corpse at our rear… and he’s awfully spry for a dead fellow!”
So things are not looking too good for the party at this point – but seeing as how we just triggered another event, all the tokens are returned to the cup/bag… so at least there’s nothing to worry about for a few more round yet!
* * *
And that’s the gist of things. Obviously, you can make the tables as complicated as you like (I’ve just used fairly basic ones here, as I wanted to keep it contained to a single page), and you can decide for yourself how many counters need to be in play to trigger a particular event (for example, in another dungeon you might need 6 tokens to trigger a trap, but only two tokens to activate a wandering monster) - but hopefully this example shows the basics of how the dungeon itself is generated.
There’s still a lot of work to do yet (and I hope to test it out in a co-op game of HeroQuest with my brother at some point) – but I think the idea itself is fairly sound, and the new tiles & doors that I’ve made are perfect for this kind of thing.
So yeah, I don’t think any of these ideas are particularly new or revolutionary – they’re just something I wanted to have a go at making myself (so that I can base it around all of the scatter terrain that I've been making these past few years) ...and so that’s exactly what I’ve been doing :)
And, if it's something that you'd like to hear more about, then please do let me know :)
* * *
EDIT: A few things have changed since this playtest - but the basic idea is still pretty much the same.


